4. Deploy Cluster#
At this point, BlueBanquise configuration is done. We are ready to deploy the cluster.
We are going to proceed in the following order:
Deploy configuration on management1 node
Deploy fresh OS on the other nodes, from management1
Deploy configuration on the other nodes.
It is assumed that you already have deployed a fresh operating system on the management node management1.
4.1. Install vital dependencies#
Use the provided bootstrap tool to install needed dependencies for your current system (recent python) and setup bluebanquise user.
Note that you need the sudo command to be installed on the system.
Using root user (or a sudo user), launch the bootstrap script.
The script will install needed packages (mostly python), create the bluebanquise user with home at /var/lib/bluebanquise,
set this user sudoer, install Ansible in a virtual environment in this user’s home, and generate an ssh keys pair for this user.
Script is verbose to help you debug in case of issues.
curl -o online_bootstrap.sh https://raw.githubusercontent.com/bluebanquise/bluebanquise/master/bootstrap/online_bootstrap.sh
chmod +x online_bootstrap.sh
./online_bootstrap.sh
Now, login as bluebanquise user. Remaining documentation assumes you are using the bluebanquise user.
sudo su - bluebanquise
4.2. Management deployment#
4.2.1. Import inventory#
Import the inventory previsouly created in this documentation into /var/lib/bluebanquise/inventory.
4.2.2. Set BlueBanquise repository#
In order to be able to download BlueBanquise packages (mostly for pex_stack role), you need to add BlueBanquise repository into the inventory.
Repository is differend depending of OS.
Create file /var/lib/bluebanquise/inventory/group_vars/all/repositories.yml with the following content:
RHEL like system:
CloudLinux
EL8:
repositories:
  - name: bluebanquise
    baseurl: http://bluebanquise.com/repository/releases/latest/el8/x86_64/bluebanquise/
    enabled: 1
    state: present
EL9:
repositories:
  - name: bluebanquise
    baseurl: http://bluebanquise.com/repository/releases/latest/el9/x86_64/bluebanquise/
    enabled: 1
    state: present
Ubuntu or Debian like systems:
Ubuntu 20.04:
repositories:
  - repo: deb [trusted=yes] http://bluebanquise.com/repository/releases/latest/u20/x86_64/bluebanquise/ focal main
    state: present
Ubuntu 22.04:
repositories:
  - repo: deb [trusted=yes] http://bluebanquise.com/repository/releases/latest/u22/x86_64/bluebanquise/ jammy main
    state: present
Debian 11:
repositories:
  - repo: deb [trusted=yes] http://bluebanquise.com/repository/releases/latest/deb11/x86_64/bluebanquise/ bullseye main
    state: present
Debian 12:
repositories:
  - repo: deb [trusted=yes] http://bluebanquise.com/repository/releases/latest/deb12/x86_64/bluebanquise/ bookworm main
    state: present
Suse like system:
repositories:
  - name: bluebanquise
    disable_gpg_check: true
    baseurl: https://bluebanquise.com/repository/releases/latest/lp15/x86_64/bluebanquise/
4.2.3. Create management playbook#
Create /var/lib/bluebanquise/playbooks folder and add a file called management1.yml playbook into this folder,
with the following content:
---
- name: management playbook
hosts: "management1"
roles:
# Infrastructure
- role: bluebanquise.infrastructure.hosts_file
tags: hosts_file
- role: bluebanquise.infrastructure.set_hostname
tags: set_hostname
- role: bluebanquise.infrastructure.repositories
tags: repositories
- role: bluebanquise.infrastructure.nic
tags: nic
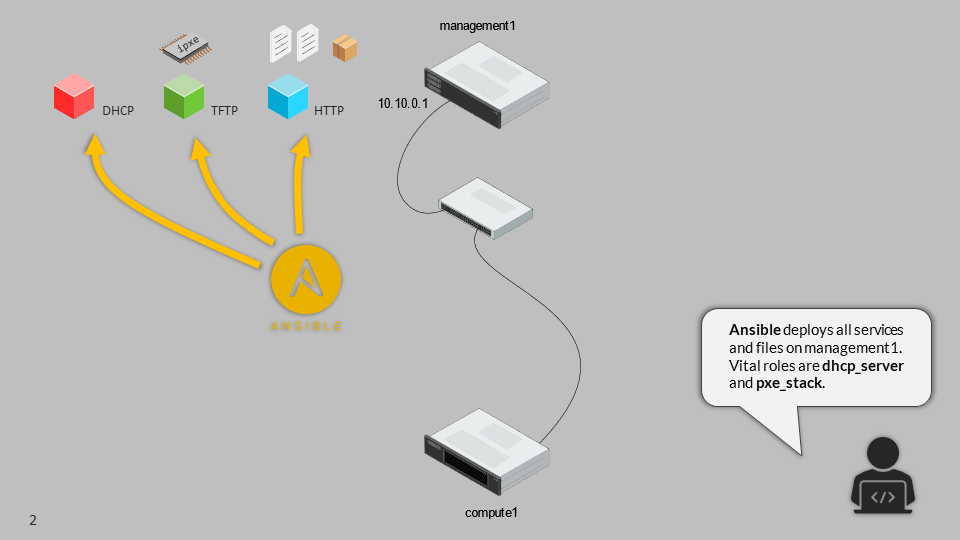
- role: bluebanquise.infrastructure.dhcp_server
tags: dhcp_server
- role: bluebanquise.infrastructure.dns_client
tags: dns_client
- role: bluebanquise.infrastructure.dns_server
tags: dns_server
- role: bluebanquise.infrastructure.http_server
tags: http_server
- role: bluebanquise.infrastructure.pxe_stack
tags: pxe_stack
- role: bluebanquise.infrastructure.ssh_client
tags: ssh_client
- role: bluebanquise.infrastructure.time
tags: time
vars:
time_profile: server
Note that this is a basic example to have a working basic cluster. More roles are available in the infrastructure collection.
Then, we will ask Ansible to read this playbook, and execute all roles listed inside on management1 node (check hosts at top of the file).
To do so, we are going to use the ansible-playbook command.
4.2.4. Ansible-playbook#
ansible-playbook is the command used to ask Ansible to execute a playbook.
We are going to use 2 parameters frequently:
4.2.4.2. Extra vars#
Extra-vars allows to pass variables with maximum precedence at execution time, for any purpose (debug, test, or simply need).
To do so, use:
–extra-vars with “ “ and space separated variables: –extra-vars “myvar1=true myvar2=77 myvar3=hello”
Note: you need to use json syntax to pass dicts or list to extra vars.
4.2.5. Apply management1 configuration#
Lets apply now the whole configuration on management1. It can take some time depending on your CPU and your hard drive, and your network connection when using external repositories.
We first ensure our NICs are up, so the repositories part is working. Ensure not to cut your connection if working remotely.
ansible-playbook playbooks/managements.yml -b -i inventory --limit management1 --tags set_hostname,nic
Check interfaces are up (check using ip a command), and then setp repositories:
ansible-playbook playbooks/managements.yml -b -i inventory --limit management1 --tags repositories
Then play the whole playbook:
ansible-playbook playbooks/managements.yml -b -i inventory --limit management1
And wait…
If all went well, you can check that all services are up and running.
Note
You can replay the same ansible-playbook command over and over, Ansible will just update/correct what is needed, and do nothing for all that is at an expected state.
Now that management1 is up and running, it is time to deploy the other nodes.
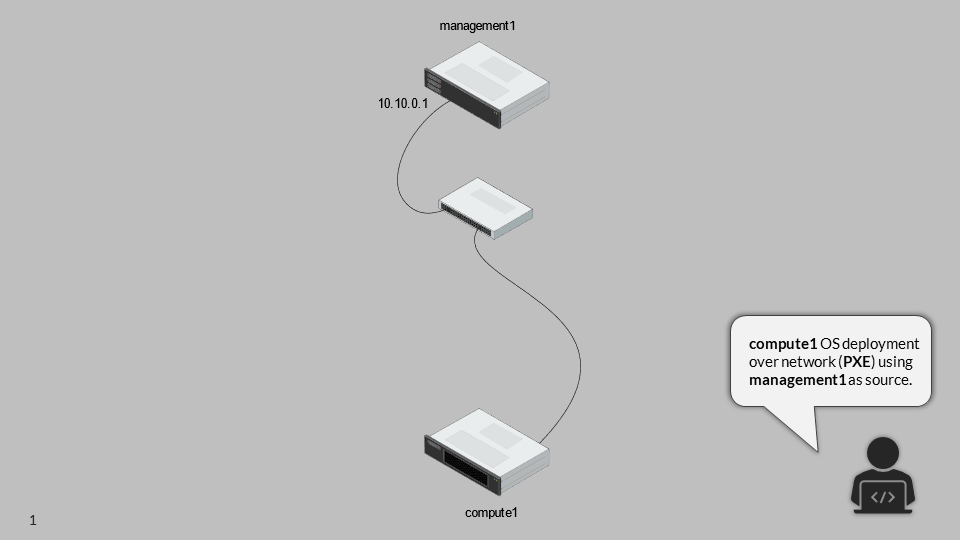
4.3. Deploy OS on other nodes: PXE#
Next step is to deploy the other nodes using PXE process.
NOTE: it is assumed here you know how to have your other nodes / VM / servers / workstation to boot on LAN.
If your device cannot boot on LAN, use iso or usb image provided on management1 in /var/www/html/pxe/bin/[x86_64|arm64]. These images will start a LAN boot automatically, even if your computer is not PXE able natively.
In BlueBanquise, PXE process has been made so that any kind of hardware able to boot PXE, USB or CDrom can start deployment.
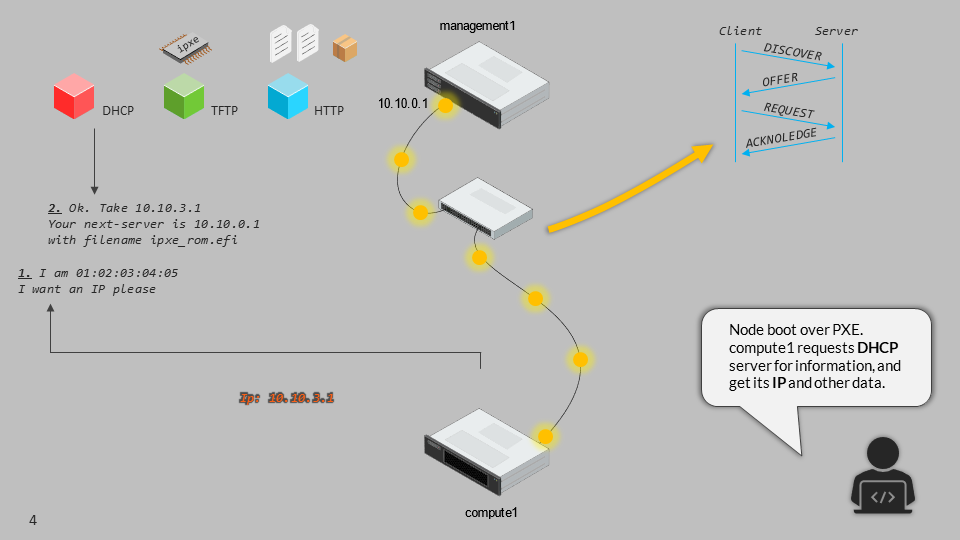
4.3.1. PXE process overview#
You can get more information and a detailed schema in the pxe_stack role section of this documentation. Simply explained, the PXE chain is the following (files are in /var/www/html/pxe):
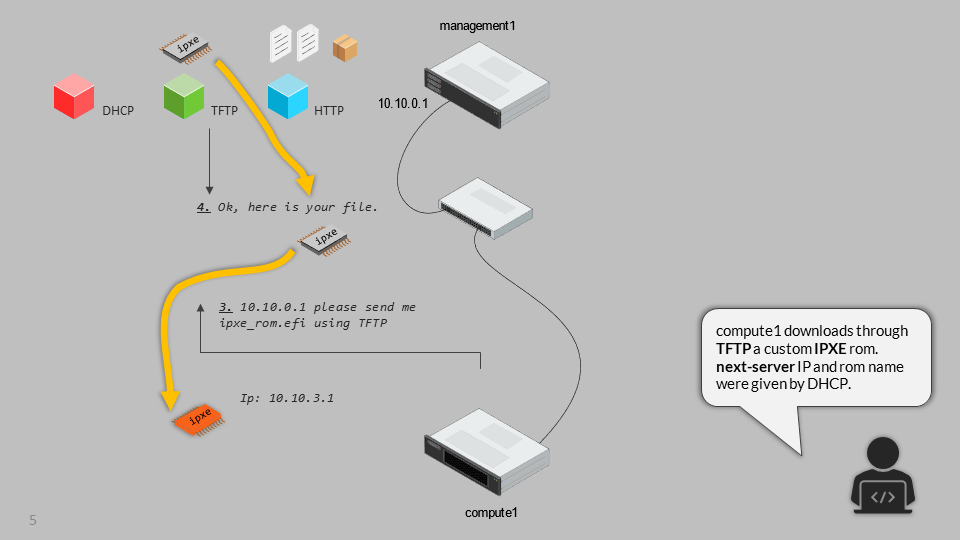
DHCP request
|
IP obtained, next-server obtained
|
Download (tftp) and load bluebanquise iPXE ROM
|
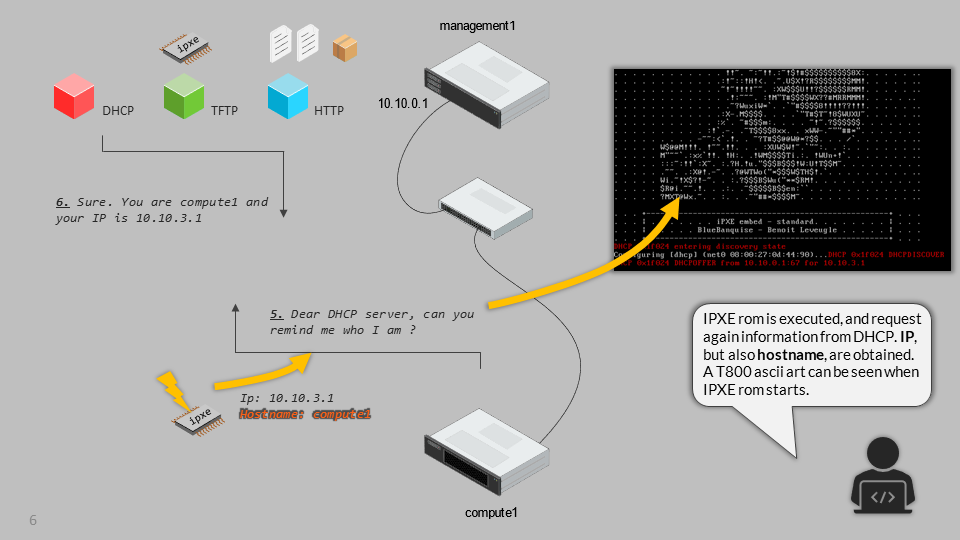
DHCP request again with new ROM
|
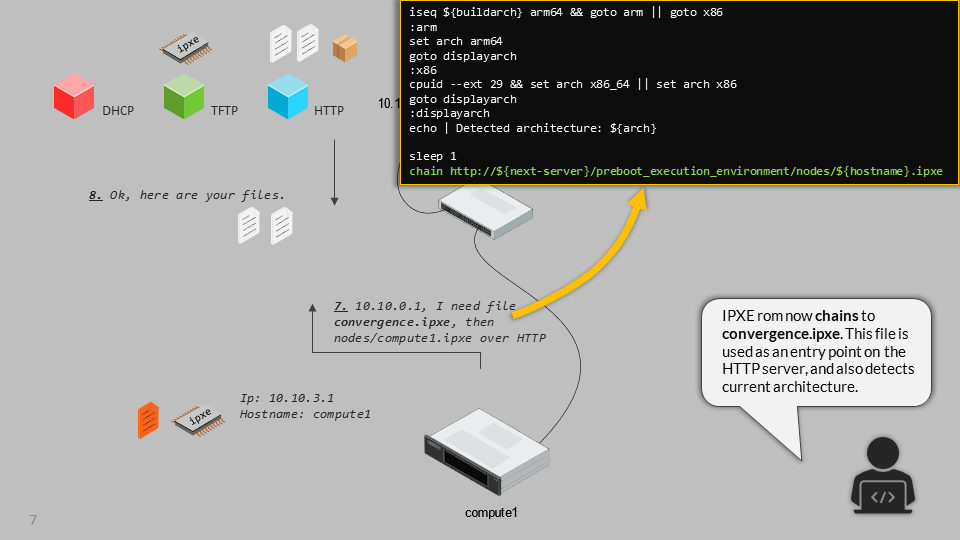
iPXE chain to convergence.ipxe (using http)
|
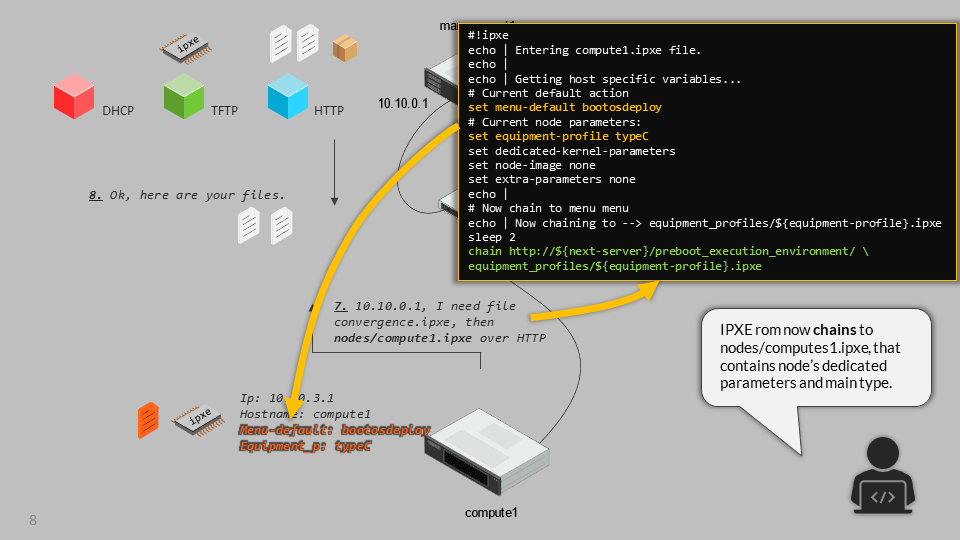
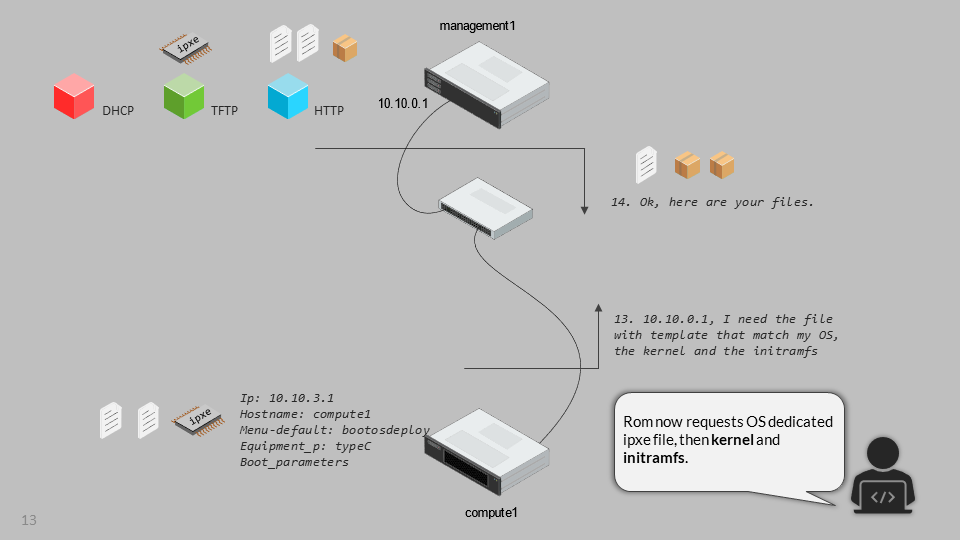
iPXE chain to nodes/myhostname.ipxe (get dedicated values)
|
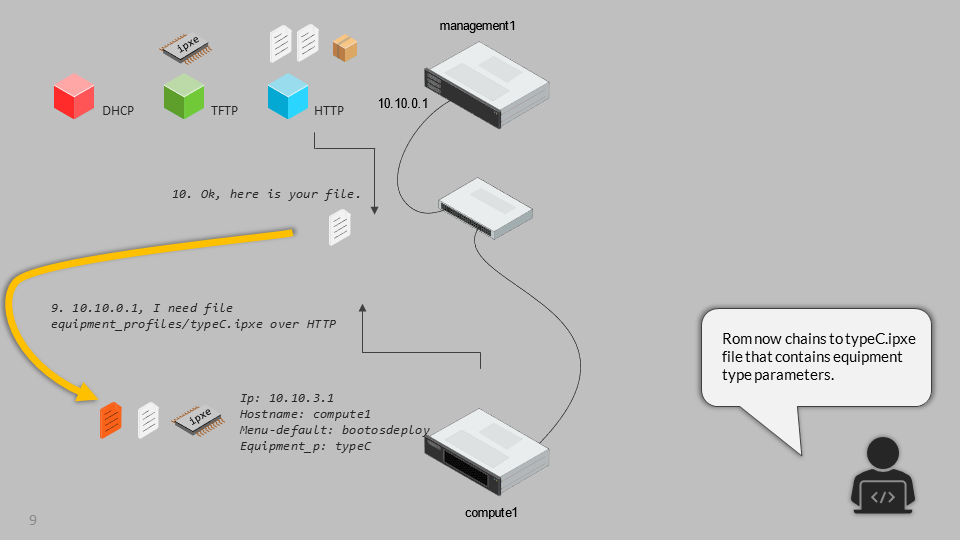
iPXE chain to equipment_profiles/my_equipment_profile.ipxe (get group dedicated values)
|
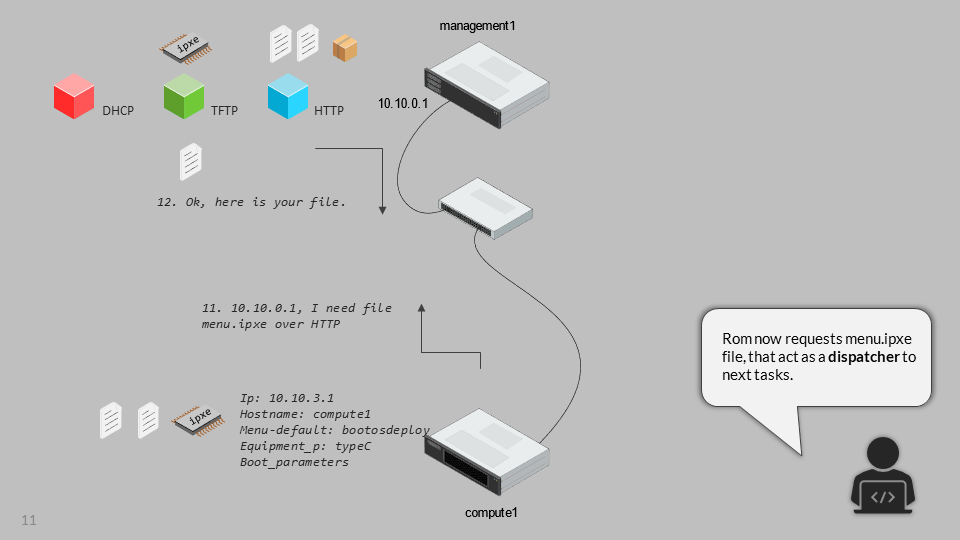
iPXE chain to menu.ipxe
|
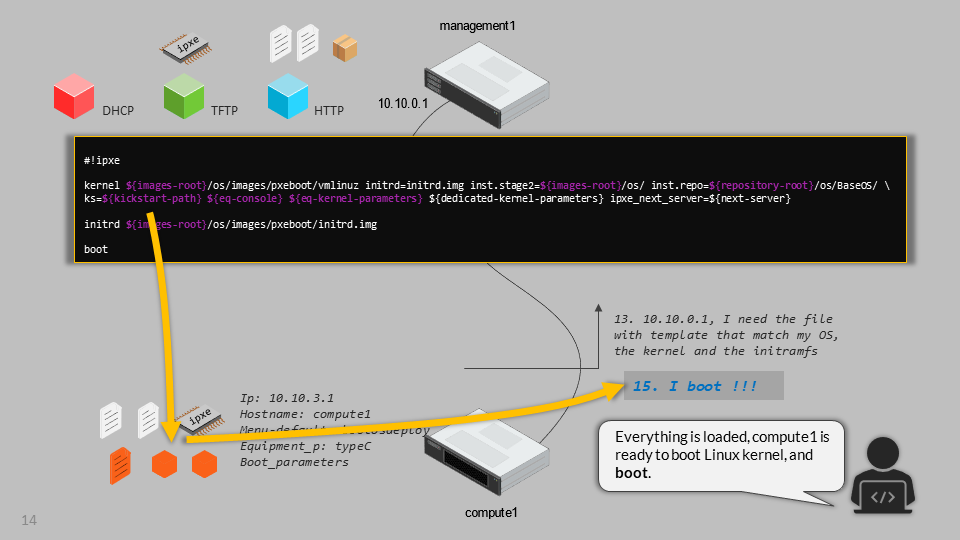
iPXE chain to task specified in myhostname.ipxe (deploy os, boot on disk, etc)
Whatever the boot source, and whatever Legacy BIOS or UEFI, all converge to
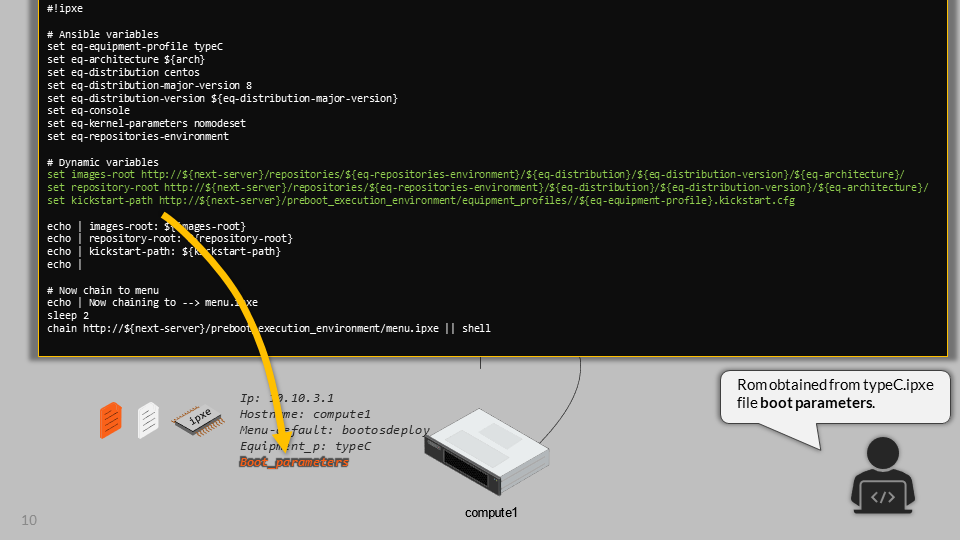
http://${next-server}/pxe/convergence.ipxe. Then this
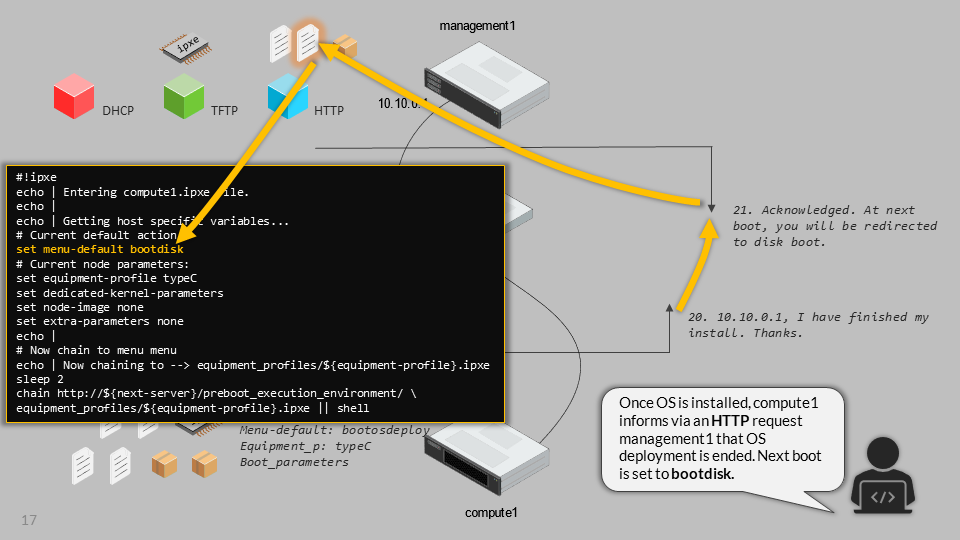
file chain to node specific file in nodes (this file is generated using bluebanquise-bootset
command). The node specific file contains the default entry for the iPXE menu,
then node chain to its equipment_profile file, to gather group values, and chain
again to menu file. The menu file display a simple menu, and wait 10s for user
before starting the default entry (which can be os deployment, or boot to disk,
or boot diskless).
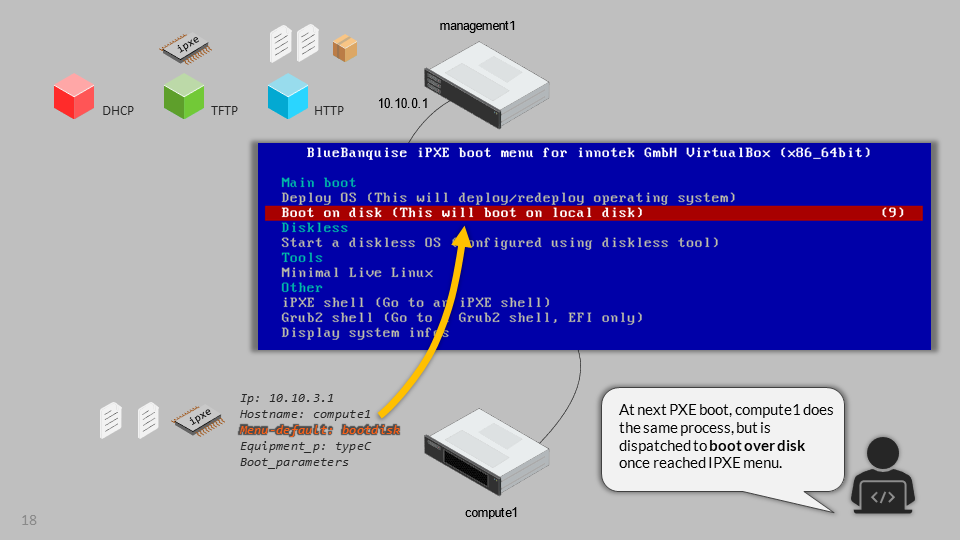
The following slides explain the whole PXE process of the BlueBanquise stack:
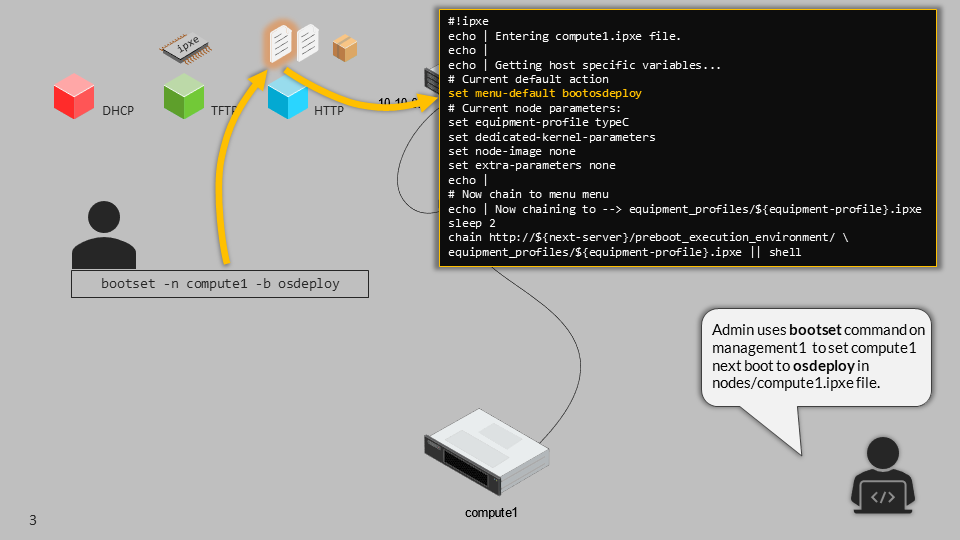
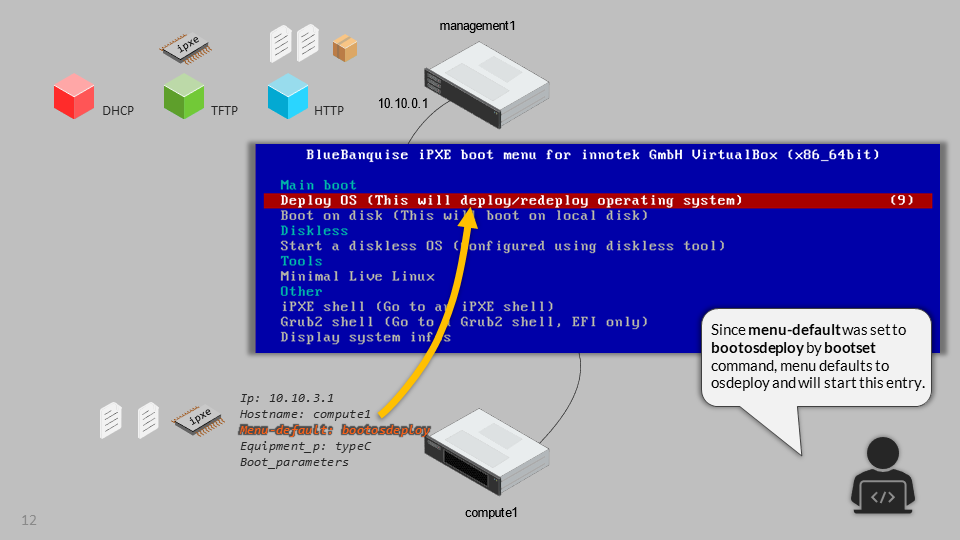

4.3.2. bluebanquise-bootset#
Before booting remote nodes in PXE, we need to ask management1 to activate remote nodes deployment. If not, remote nodes will not be able to grab their dedicated configuration from management node at boot.
To manipulate nodes PXE boot on management1 (aka set PXE chain configuration), a command, bluebanquise-bootset, is available.
We are going to deploy login1, storage1 and compute1, compute2, compute3 and compute4.
Let’s use bluebanquise-bootset to set them to deploy OS at next PXE boot (bluebanquise-bootset must be launched using sudo if not root):
sudo bluebanquise-bootset -n login1,storage1,c[001-004] -b osdeploy
You can check the result using:
sudo bluebanquise-bootset -n login1,storage1,c[001-004] -s
Which should return:
[INFO] Loading /etc/bluebanquise-bootset/nodes_parameters.yml
[INFO] Loading /etc/bluebanquise-bootset/pxe_parameters.yml
Next boot deployment: c[001-004],login1,storage1
Note that this osdeploy state will be automatically updated once OS is deployed on remote nodes, and set to disk.
You can also force nodes that boot on PXE to boot on disk using -b disk
instead of -b osdeploy.
Please refer to the pxe_stack role dedicated section in this documentation for more information on the bluebanquise-bootset usage.
4.3.3. SSH public key#
In order to log into the remote nodes without giving the password, check that
the ssh public key defined in your os groups inventory (os_admin_ssh_keys key) matches your
management1 public key (the one generated in /var/lib/bluebanquise/.ssh/). If not, update the
inventory and remember to re-run the pxe_stack role (to update
PXE related files that contains the ssh public key of the management node to be
set on nodes during deployment).
ansible-playbook playbooks/managements.yml -b -i inventory --limit management1 --tags pxe_stack
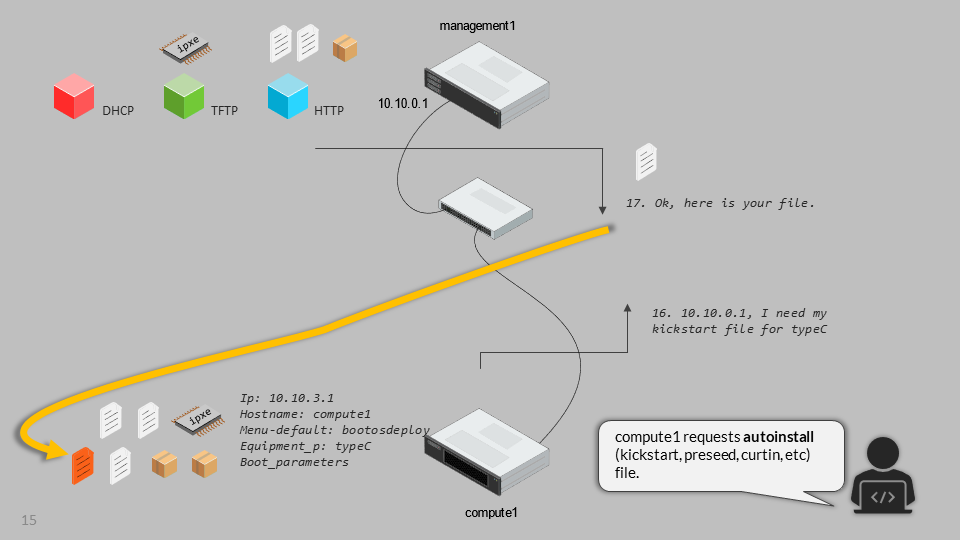
4.3.4. OS deployment#
Power on now the remote nodes, have them boot over LAN, and watch the automatic installation procedure. It should take around 5-20 minutes depending on your hardware.
Once done, proceed to next part.
4.4. Apply other nodes configuration#
Now that all the nodes have an operating system installed and running, applying configuration on these nodes is simple.
Ensure first you can ssh passwordless on each of the freshly deployed nodes.
Note
On some Linux distributions, if DHCP leases are short, you may loose ip shortly after system is booted. If that happen, reboot system to get an ip again. This issue is solved once the nic role has been applied on hosts, as it sets ip statically.
We will deploy configuration on compute1 node as an example.
Create file playbooks/computes.yml with the following content:
---
- name: computes playbook
  hosts: "fn_compute" # This is a group
  roles:

    # Infrastructure

    - role: bluebanquise.infrastructure.hosts_file
      tags: hosts_file
    - role: bluebanquise.infrastructure.set_hostname
      tags: set_hostname
    - role: bluebanquise.infrastructure.repositories
      tags: repositories
    - role: bluebanquise.infrastructure.nic
      tags: nic
    - role: bluebanquise.infrastructure.ssh_remote_keys
      tags: ssh_remote_keys
    - role: bluebanquise.infrastructure.time
      tags: time
      vars:
        time_profile: client
And execute it while targeting compute1 (if you do not limit it, it will deploy configuration in parallel on all the members of the fn_compute group):
ansible-playbook playbooks/computes.yml -b -i inventory --limit compute1
If you do not set the limite, and have multiple compute nodes up and running, you will see that Ansible will work on computes nodes in parallel, using more CPU on the management1 node (by spawning multiple forks).
Your cluster should now be fully deployed the generic way: operating systems are deployed on each hosts, and basic services (DNS, repositories, time synchronization, etc.) are up and running.
You can now use the other sections to go futher and specialize your cluster.
Thank your for following this training. I really hope you will enjoy the stack. Please report me any bad or good feedback.