3. Configure BlueBanquise#
The first step is to prepare the future cluster inventory. This part can be done “offsite” in advance, meaning you can already create and assemble all the future inventory before having the hardware at disposal.
You should however have at disposal Ansible to ease your task.
3.1. Install Ansible#
Simply install python3 and pip3 for your operating system. Also make sure your python3 installation supports venv (virtual python environments). This part even works in Microsoft Windows, since python3 is available on win64 systems.
Once python3 is installed, create a virtual environment and install Ansible and its dependencies using:
python3 -m venv ansible_venv
source ansible_venv/bin/activate
python3 -m pip install --upgrade pip
pip3 install setuptools setuptools_rust
pip3 install ansible
Note that in the future, to use this Ansible installation, you will have to always source the virtual environment.
Test Ansible is working (refer to this Ansible tutorial if you do not know Ansible.).
Create now the future inventory.
3.2. Create inventory#
It is important to understand inventory structure.
By default, main location are the following (assuming relative to inventory/):
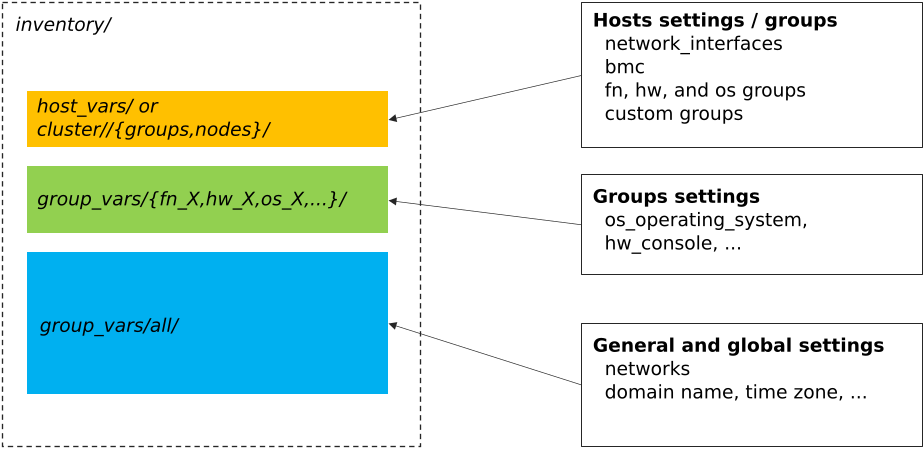
cluster/nodes/andcluster/groups/: this is where nodes are listed, with their dedicated network parameters, and linked to desired groupsgroup_vars/my_group_name/: this is where groups are described (OS to be used, kernel parameters, partitioning, iPXE settings, etc.)group_vars/all/: this is where stack global values are set (logical networks, domain name, etc.)
Then, each described node will inherit from these settings. It is important to understand that some settings are linked. For example,
a node set as member of group os_debian_12 will inherit this group parameters. Also, if a network interface of this node is
linked to logical network net-1, it will inherit all net-1 network parameters. Etc.
Create needed folders first:
mkdir -p inventory/group_vars/all/
mkdir -p inventory/cluster/nodes
mkdir inventory cluster/groups
We are now going to populate inventory for the following basic example cluster:

Whatever the future cluster shape, you should start small with this, and extend it once working fine.
3.2.1. Add first management node#

Let’s add the first node, management1. This is a special node, as it will be the manager of the cluster.
Create file cluster/nodes/management.yml (YAML file) and add the following content inside:
all:
  hosts:
    management1:
Note
We create here one file per function, as it seems easier to maintain. However, all these files are flattened by
Ansible during execution, which means we could create a single nodes.yml file that would contain all the nodes in once.
It is up to you.
Now create file cluster/groups/fn (INI file) with the following content:
[fn_management]
management1
We will assume in this example that this server is a supermicro_X10DRT and that we are going to deploy AlmaLinux 9 on it.
Create file cluster/groups/hw (INI file) with the following content:
[hw_supermicro_X10DRT]
management1
Then create file cluster/groups/os (INI file) with the following content:
[os_almalinux_9]
management1
Now check the result:
oxedions@prima:~/$ ansible-inventory -i inventory/ --graph
@all:
  |--@ungrouped:
  |--@fn_management:
  |  |--management1
  |--@hw_supermicro_X10DRT:
  |  |--management1
  |--@os_almalinux_9:
  |  |--management1
oxedions@prima:~/$
We can see that our management1 host is part of 3 groups:
fn_managementwhich is its function (a management node)hw_supermicro_X10DRTwhich is the hardware definitionos_almalinux_9which is the os definition
This creates a new equipment profile (see vocabulary section of this documentation).
3.2.2. Add network#

Lets now add the network. All our hosts will be connected to a network 10.10.0.0/16 called net-1.
Create file group_vars/all/networks.yml with the following content:
networks:
  net-1:
    subnet: 10.10.0.0
    prefix: 16
In BlueBanquise, nodes are connected together through networks. Most of the time, logical networks will match your physical network, but for advanced networking, it can be different.
All networks are defined in group_vars/all/networks.yml file.
It is IMPORTANT to understand that the prefix net- means to the stack “this is a administration network”.
In BlueBanquise there are two kind of networks: administration networks, and simple networks.
Any network starting its name with prefix net- will be considered an admininstration network. All other networks will be considered simple networks.
An administration network is used to deploy and manage the nodes. It will be for
example used to run a DHCP server, handle the PXE stack, etc, and also all the
Ansible ssh connections. Administration networks have a strict naming
convention, which by default is: net-.
3.2.3. Connect node to network#

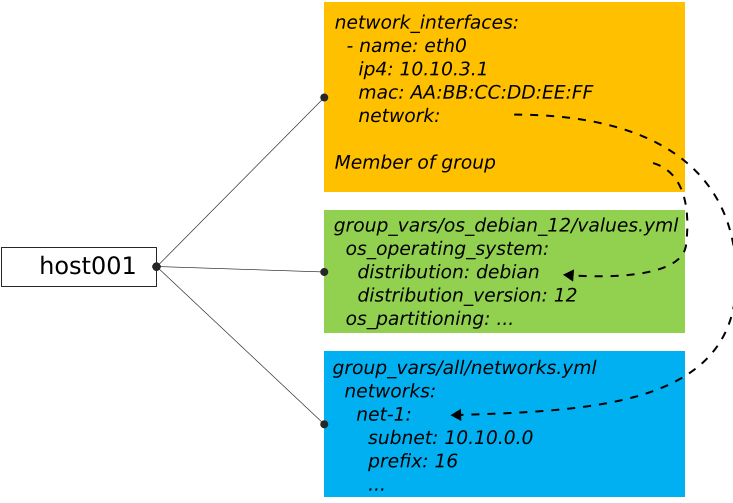
Now connect management1 to this network. Edit file cluster/nodes/management.yml and add management1
network interface:
all:
  hosts:
    management1:
      network_interfaces:
        - interface: enp0s3
          ip4: 10.10.0.1
          mac: 08:00:27:dc:f8:f5
          network: net-1
It should not be too difficult to understand this file.
What is essential here is to understand that order network interfaces are defined under network_interfaces variable matters. Rules are the following:
The first interface in the list is the resolution interface. This is the one a ping will try to reach.
The first interface attached to a management network is the main network interface (remember, management networks are the ones prefixed
net-). This is the one ssh and so Ansible will use to connect to the node.
If these rules do not comply with your needs, remember that the stack logic can
be precedenced: simply re-define logic variables like j2_node_main_resolution_network or
j2_node_main_network manually under host.
Note
You may not already know the interface name, or even the MAC address. You will be able to update it later, once server is reachable.
3.2.4. Set services endpoint#
We need to define our services endpoint on the net-1 network.
This endpoint is the IP address to be targeted by clients on the network to reach critical services (dns server, time server, etc).
The stack allows to define different IPs or hostnames for each kind of service,
but a magic key exists and allows to define all of them at once with the same value: services_ip
This is enough for our basic cluster.
Edit group_vars/all/networks.yml and add the key under net-1 network:
networks:
  net-1:
    subnet: 10.10.0.0
    prefix: 16
    services_ip: 10.10.0.1
3.2.5. Configure hardware and os#

management1 is part of hw_supermicro_X10DRT and os_almalinux_9 groups.
We now need to define its hardware and operating system settings.
Create file group_vars/hw_supermicro_X10DRT/settings.yml with the following content:
hw_equipment_type: server # This will allow the stack to understand its an OS target and so a PXE profile should be created for it.

hw_specs: # Defining hpw_specs is optional for now, as most infrastructure do not need it.
          # It is however mandatory later for some specialized roles like Slurm in HPC collection.
  cpu:
    name: Intel E5-2667 v4
    cores: 32
    cores_per_socket: 8
    sockets: 2
    threads_per_core: 2
  gpu:

hw_console: console=tty0 console=ttyS1,115200
hw_kernel_parameters: nomodeset # This is just an example here, you can leave this empty or even not define it.

hw_board_authentication: # Authentication on BMC, optional if you do not have a BMC to manage the server.
  - protocol: IPMI
    user: ADMIN
    password: ADMIN

# You can even add custom variables if it helps you later
# Like adding a link to page where manual can be found
hw_vendor_url: https://www.supermicro.com/en/products/motherboard/X10DRT-L
These are hardware related settings. Tune this content according to your needs. For example, if you are testing the stack in VMs, do not set a console (or leave it empty), etc.
Note
This is an example. The only mandatory value here is hw_equipment_type as it is needed for the stack to identify the hardware as a server.
The full list of available parameters is given into the variables description page.
Now create file group_vars/os_almalinux_9/settings.yml with the following content:
os_operating_system:
  distribution: almalinux
  distribution_major_version: 9

os_access_control: enforcing
os_firewall: true

os_keyboard_layout: us
os_system_language: en_US.UTF-8

os_partitioning: |
  clearpart --all --initlabel
  autopart --type=plain --fstype=ext4

os_admin_password_sha512: $6$JLtp9.SYoijB3T0Q$q43Hv.ziHgC9mC68BUtSMEivJoTqUgvGUKMBQXcZ0r5eWdQukv21wHOgfexNij7dO5Mq19ZhTR.JNTtV89UcH0
Note
The password here is “rootroot”.
PLEASE, do not use that password in production. Generate your own strong password using python3 command:
python3 -c 'import crypt,getpass; print(crypt.crypt(getpass.getpass(), crypt.mksalt(crypt.METHOD_SHA512)))'
Note
This is again an example. The only mandatory value here is os_operating_system as it is needed
for the stack to identify the operating system to be deployed on the target via PXE.
The full list of available parameters is given into the variables description page.
That is all for our management1 server. We can now define the other servers.
3.2.6. Add remaining nodes#

Proceed as with management1 node. We will do computes1 to compute4, other nodes can then be added the same way.
First create file cluster/nodes/compute.yml (YAML file) and add the following content inside:
all:
  hosts:
    compute1:
      network_interfaces:
        - interface: eno1
          ip4: 10.10.3.1
          mac: 08:00:27:dc:f8:a1
          network: net-1
    compute2:
      network_interfaces:
        - interface: eno1
          ip4: 10.10.3.2
          mac: 08:00:27:dc:f8:a2
          network: net-1
    compute3:
      network_interfaces:
        - interface: eno1
          ip4: 10.10.3.3
          mac: 08:00:27:dc:f8:a3
          network: net-1
    compute4:
      network_interfaces:
        - interface: eno1
          ip4: 10.10.3.4
          mac: 08:00:27:dc:f8:a4
          network: net-1
Now edit file cluster/groups/fn (INI file) with the following content:
[fn_management]
management1

[fn_compute]
compute[1:4]
We will assume in this example that these servers are supermicro_X13QEH and that we are going to deploy AlmaLinux 9 (like management1) on it. So it means these servers will share the same os group than management1, but will have a different hw group.
Edit file cluster/groups/hw (INI file) with the following content:
[hw_supermicro_X10DRT]
management1

[hw_supermicro_X13QEH]
compute[1:4]
Then Edit file cluster/groups/os (INI file) with the following content:
[os_almalinux_9]
management1
compute[1:4]
Now check the result:
(pydevs) oxedions@prima:~/tmp_devs$ ansible-inventory -i inventory/ --graph
@all:
  |--@ungrouped:
  |--@fn_management:
  |  |--management1
  |--@fn_compute:
  |  |--compute1
  |  |--compute2
  |  |--compute3
  |  |--compute4
  |--@hw_supermicro_X10DRT:
  |  |--management1
  |--@hw_supermicro_X13QEH:
  |  |--compute1
  |  |--compute2
  |  |--compute3
  |  |--compute4
  |--@os_almalinux_9:
  |  |--management1
  |  |--compute1
  |  |--compute2
  |  |--compute3
  |  |--compute4
(pydevs) oxedions@prima:~/tmp_devs$
Finally, create the new hw profile. Create file group_vars/hw_supermicro_X13QEH/settings.yml with the following content:
hw_equipment_type: server

hw_specs:
  cpu:
    name: Intel 6416H
    cores: 144
    cores_per_socket: 18
    sockets: 4
    threads_per_core: 2
  gpu:

hw_console: console=tty0 console=ttyS1,115200

hw_board_authentication: # Authentication to BMC
  - protocol: IPMI
    user: ADMIN
    password: ADMIN
You can check which parameters are linked to a specific node using the ansible-inventory command:
(pydevs) oxedions@prima:~/tmp_devs$ ansible-inventory -i inventory/ --host management1 --yaml
hw_board_authentication:
- password: ADMIN
  protocol: IPMI
  user: ADMIN
hw_console: console=tty0 console=ttyS1,115200
hw_equipment_type: server
hw_kernel_parameters: nomodeset
hw_specs:
  cpu:
    cores: 32
    cores_per_socket: 8
    name: Intel E5-2667 v4
    sockets: 2
    threads_per_core: 2
  gpu: null
hw_vendor_url: https://www.supermicro.com/en/products/motherboard/X10DRT-L
os_access_control: enforcing
os_admin_password_sha512: $6$JLtp9.SYoijB3T0Q$q43Hv.ziHgC9mC68BUtSMEivJoTqUgvGUKMBQXcZ0r5eWdQukv21wHOgfexNij7dO5Mq19ZhTR.JNTtV89UcH0
os_firewall: true
os_keyboard_layout: us
os_operating_system:
  distribution: almalinux
  distribution_major_version: 9
os_partitioning: clearpart --all --initlabel autopart --type=plain --fstype=ext4
os_system_language: en_US.UTF-8
(pydevs) oxedions@prima:~/tmp_devs$
Proceed the same way to add all nodes to the inventory.
3.2.7. Connect cluster to the world (optional)#
You may need to connect the cluster to a gateway, or even configure a server as a gateway. In this example, login1 will act as a gateway.
3.2.8. Set global settings#
The last step in building the inventory is to set global settings. This includes the name of the cluster, the domain name of the cluster, and the time zone of the cluster.
Create file group_vars/all/global.yml with the following content:
bb_domain_name: bluebanquise-cluster.local
bb_time_zone: Europe/Brussels
bb_cluster_name: bluebanquise-cluster
Tune these values according to your needs.
Your basic inventory is now ready. Refer to the variables description page for more parameters available.